
When you first start learning Laravel, it can feel like a lot happens automatically. That is the Laravel request lifecycle at work.
You enter a URL, Laravel finds a route, a controller runs, data comes from the database, and somehow a complete webpage appears in your browser.
But what actually happens between clicking a link and seeing that page?
Understanding the Laravel request lifecycle can make the framework much easier to work with. Instead of simply memorizing routes, controllers, middleware, and views, you can understand how they connect and why Laravel uses them.
In this guide, we’ll follow a request from the moment it leaves your browser until Laravel sends a response back. If you haven’t set up a project yet, start with our step-by-step guide on how to create a Laravel project.
What Is the Laravel Request Lifecycle?
The Laravel request lifecycle describes the journey an HTTP request takes through a Laravel application.
In simple terms, the process looks something like this:
Browser
   ↓
Web Server
   ↓
public/index.php
   ↓
Laravel Application
   ↓
Middleware
   ↓
Router
   ↓
Controller
   ↓
Model / Database
   ↓
View
   ↓
Response
   ↓
Browser
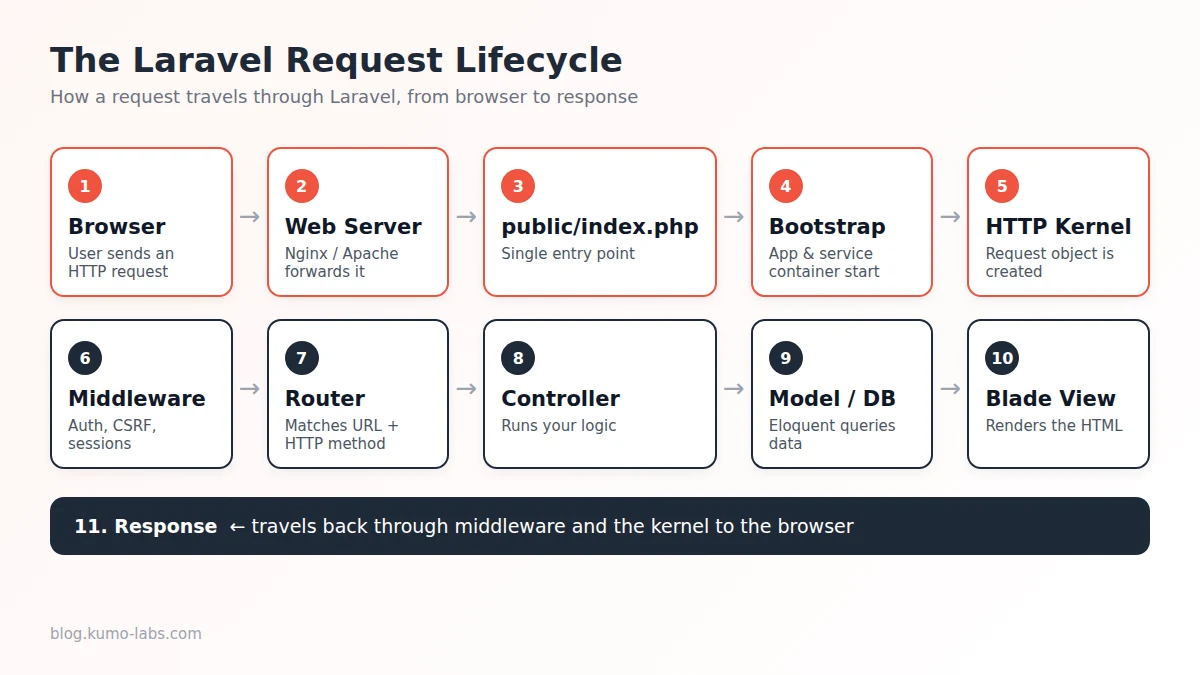
Not every request follows exactly the same path. For example, an API request might return JSON instead of an HTML view.
However, this basic flow gives you a useful mental model for understanding how Laravel works. For a deeper technical reference, see the official Laravel request lifecycle documentation.
Step 1: The User Sends an HTTP Request
Everything starts with a request.
Imagine a user visits:
https://example.com/products
The browser sends an HTTP request to the server.
The request can contain information such as:
- The URL
- HTTP method
- Headers
- Cookies
- Query parameters
- Form data
- Uploaded files
For example, when someone submits a login form, the request may contain an email address and password.
Laravel doesn’t receive this request directly from the browser. The request first reaches the web server.
Step 2: The Web Server Sends the Request to Laravel
The web server, such as Apache or Nginx, receives the request.
For a properly configured Laravel application, the web server’s document root points to the application’s public directory.
Inside that directory is an important file:
public/index.php
This file acts as the main entry point for web requests.
Instead of having every URL point to a different PHP file, Laravel sends requests through this central entry point.
This is one of the reasons Laravel can provide a consistent application structure.
Step 3: Laravel Starts the Application
The request reaches:
public/index.php
Laravel then begins loading the application.
The framework loads the application’s configuration, services, environment settings, and other required components.
This process is sometimes called bootstrapping.
You don’t normally need to manually perform these steps every time you create a route or controller. Laravel handles much of this work for you.
That’s one reason the framework can feel like it is doing things “automatically” when you’re first learning it.
Step 4: Laravel Creates the Request
Laravel uses the incoming HTTP information to create a request object.
The request object represents what the user sent to the application.
For example, if a user submits:
name = Shreya
email = [email protected]
Laravel can access that information through the request.
A controller might receive the request like this:
public function store(Request $request)
{
    $name = $request->name;
}
The request object gives your application a structured way to work with incoming data.
Step 5: Middleware Gets Involved
Before the request reaches the final destination, it may pass through middleware.
Middleware can be thought of as a checkpoint between the incoming request and your application’s main logic.
For example, middleware can be used to:
- Check whether a user is logged in
- Verify a CSRF token
- Check permissions
- Add or modify request information
- Apply rate limits
- Perform other checks before the request continues
Imagine a user tries to access:
/dashboard
If the dashboard requires authentication, Laravel can use authentication middleware to check whether the user is logged in.
If the user is authenticated, the request can continue.
If not, Laravel can redirect the user to a login page.
A simplified flow looks like this:
Request
   ↓
Middleware
   ↓
Allowed?
  ↙   ↘
Yes    No
 ↓      ↓
Route   Redirect
Middleware is therefore an important part of the Laravel request lifecycle.
Step 6: Laravel Finds the Route
Once the request passes through the relevant middleware, Laravel’s router determines which route matches the requested URL.
For example, you might have:
Route::get('/products', [ProductController::class, 'index']);
When someone visits:
/products
Laravel matches the request to this route.
It then knows that it needs to call:
ProductController
and specifically the:
index
method.
This is where Laravel’s routing system connects the URL to your application’s code.
Step 7: The Controller Handles the Request
The controller is often responsible for coordinating what should happen next.
For example:
public function index()
{
    $products = Product::all();

    return view('products.index', [
        'products' => $products
    ]);
}
Here, the controller asks the Product model for data and then passes that data to a view.
A controller doesn’t have to contain every piece of application logic. In larger applications, developers often separate responsibilities into services, actions, jobs, or other classes.
For beginners, however, it is useful to think of the controller as the part that coordinates the request.
Step 8: Laravel May Talk to the Database
If the page needs data, Laravel can communicate with a database.
Laravel’s Eloquent ORM makes this easier.
For example:
$products = Product::all();
This tells Laravel to retrieve the products represented by the Product model.
The application doesn’t need to manually write a complete SQL query for this simple operation.
The database returns the requested data, and Laravel passes it back to the application.
The flow now looks like:
Request
   ↓
Route
   ↓
Controller
   ↓
Model
   ↓
Database
   ↓
Model
   ↓
Controller
This is one of the most useful relationships to understand when learning Laravel.
Step 9: Laravel Creates a Response
Once the controller has finished processing the request, Laravel needs to send something back to the browser.
That something is called a response.
A response could be:
- An HTML page
- JSON data
- A redirect
- A file
- A status code
- Another type of HTTP response
For a normal webpage, the controller might return a Blade view:
return view('products.index');
Laravel then prepares the resulting response.
Step 10: Blade Generates the HTML
If the response uses a Blade view, Laravel processes the Blade template.
For example:
<h1>{{ $product->name }}</h1>
Blade takes the template and the available data and generates HTML.
The browser doesn’t receive the Blade file itself.
Instead, it receives the resulting HTML.
For example:
<h1>Laptop</h1>
The browser can then display that HTML to the user.
Step 11: The Response Travels Back to the Browser
After Laravel has finished processing the request, the response travels back through the web server and eventually reaches the browser.
The browser receives the response and renders it.
The complete journey can now be visualized as:
User enters URL
       ↓
Browser sends request
       ↓
Web Server
       ↓
public/index.php
       ↓
Laravel bootstraps
       ↓
Middleware
       ↓
Route
       ↓
Controller
       ↓
Model
       ↓
Database
       ↓
Controller
       ↓
Blade View
       ↓
HTTP Response
       ↓
Browser
That’s the basic Laravel request lifecycle.
What About Middleware on the Way Back?
There is an important detail beginners sometimes miss.
Middleware can process information both before and after the application’s main request logic.
You can think of middleware as a layer surrounding the application’s core processing.
A simplified representation is:
Incoming Request
       ↓
   Middleware
       ↓
 Route / Controller
       ↓
   Application
       ↓
   Middleware
       ↓
Outgoing Response
This allows middleware to perform tasks before the request reaches the controller and also perform actions after the application has generated a response.
This pattern is useful for things such as adding headers or performing other response-related processing.
What If the Request Is an API Request?
Not every Laravel application returns HTML.
Suppose a mobile application requests:
/api/products
The route might return JSON:
return response()->json($products);
The general lifecycle is still similar:
Request
   ↓
Middleware
   ↓
Route
   ↓
Controller
   ↓
Database
   ↓
JSON Response
   ↓
Client
The difference is what Laravel sends back.
Instead of generating an HTML page, the application returns structured data that another application can consume.
Why Understanding the Request Lifecycle Matters
You don’t need to memorize every internal Laravel class to become a good Laravel developer.
However, understanding the overall request lifecycle can make debugging much easier.
For example, imagine you visit:
/products
and receive a 404 error.
Instead of randomly changing your controller, you can think:
Did the request reach Laravel?
        ↓
Does the route exist?
        ↓
Does the HTTP method match?
        ↓
Is middleware blocking the request?
        ↓
Does the controller exist?
        ↓
Is the controller returning a response?
This gives you a logical way to troubleshoot problems.
Common Laravel Request Lifecycle Mistakes
Route Exists but Uses the Wrong HTTP Method
You may have:
Route::post('/products', ...);
but try to visit /products directly in your browser.
The browser normally sends a GET request, so the POST route won’t match.
Middleware Blocks the Request
A route may work for logged-in users but redirect guests because authentication middleware is applied.
Controller Method Is Missing
Your route may point to:
ProductController@index
while the index method doesn’t exist.
Database Query Fails
The route and controller may work correctly, but the database operation could fail because of an incorrect query, missing table, or configuration problem.
View Cannot Be Found
The controller may return:
return view('products.index');
while the corresponding Blade file doesn’t exist in the expected location.
Understanding where the request currently is in the lifecycle can help you identify which part needs attention.
A Simple Example From Start to Finish
Let’s put everything together with a small example.
Suppose your route is:
Route::get('/students', [StudentController::class, 'index']);
A user visits:
/students
Laravel receives the request.
The router matches /students to the route.
The controller method runs:
public function index()
{
    $students = Student::all();

    return view('students.index', compact('students'));
}
Laravel retrieves the student records from the database.
The data is passed to:
resources/views/students/index.blade.php
Blade generates HTML.
Laravel sends the response back to the browser.
The browser displays the student page.
The complete flow is:
/students
    ↓
Route
    ↓
StudentController
    ↓
Student Model
    ↓
Database
    ↓
Blade View
    ↓
HTML Response
    ↓
Browser
Once you understand this flow, many Laravel concepts start fitting together naturally.
Laravel Request Lifecycle vs MVC
You may notice that this process looks similar to the MVC pattern.
MVC stands for:
- Model — works with application data
- View — presents information to the user
- Controller — coordinates application logic
The request lifecycle is broader than MVC.
It explains how the request enters Laravel, passes through middleware and routing, reaches your application logic, and eventually becomes a response.
MVC is one part of the larger process.
Final Thoughts
The Laravel request lifecycle may seem complicated when you first see all the different components involved.
But you don’t need to understand every internal Laravel class immediately.
Start with the basic journey:
Request
   ↓
Middleware
   ↓
Route
   ↓
Controller
   ↓
Model / Database
   ↓
View
   ↓
Response
Once this flow becomes familiar, concepts such as routing, controllers, middleware, Eloquent, Blade, and APIs become much easier to understand. Want to see these pieces working together? Try building a Laravel Livewire contact form, or keep learning with our pick of the best Laravel podcasts for PHP developers.
Instead of thinking about Laravel as a framework that performs a lot of “magic,” you can start seeing it as a series of connected steps.
And when something goes wrong, that understanding gives you a much better place to start debugging.